|
|
Post by Father on Dec 14, 2018 21:35:56 GMT 1
Lieutenants (not counting those in the captain's squad that have been held in reserve):
Warfare (Command) TN 9, gather 2+DoS of those intended to be on the original squad, assuming they are all still in the fight. Any additional slots filled up by others (not all squads can be filled up at this point).
Then:
Warfare (Tactics) TN 9
-May single out an enemy squad to attack according to preferences (specific squad, squad belonging to specific team, squad belonging to a team of opposing faction, prepare for whatever may come your way), number of DoS determines how successful one is.
Warfare (Command) TN 9
-Grants assistance bonus (based on warfare rank) to all tests of those in his squad for a number of rounds equal to 2 per DoS scored.
-Critical Failure: members of the squad suffers -2 to all test for the entire scene.
Captains (lieutenants in their squads may assist):
Warfare (Tactics) TN 9
-Identify the place in the fighting where the reserve force will be most useful, each DoS below the highest scoring captain: -2 TS
Warfare (Command) TN 9
-Delay time before the captain's squad enters the fray is 5-DoS on the command test. (They do not have lances).
Critical Failure (on either one) counts as -3 DoS scored.
Individuals may break from their squads and seek to go up against specific opponents or squads, warfare (tactics) TN 9 required, effectively reducing his officer's DoS on the command test by 1 (may cause critical failure).
After 10 combat rounds, the scene ends and captains and lieutenants tests:
Warfare (Tactics) TN 9
Warfare (Command) TN 9
Sum up total DoS across the team (critical failure counts as -3), with the captain's DoS being multiplied by 4. Reduce TS by 1 per DoS below the highest scoring team.
Bonuses to warfare to team members:
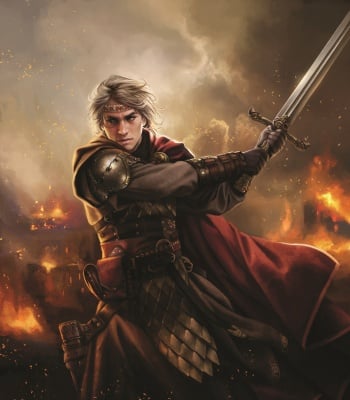
Roland: +3B+4 (Or +1D+1B+3)
Daemon: +2B+3 (Or +1D+3)
Bittersteel: +1B+3
Redtusk: +2
Robb: +2
Maekar: +2
Stormbreaker: +3
At the start of this scene, there are still two clusters of fighters (that turns into one cluster by the end of the scene, must make a command test as per captain section to see how many combat rounds it takes to engage someone in the other cluster).
Characters confirmed on-screen to be in the first:
Ulbert Starkwood
Humfrey Harding
Imre Orme
Gyles Blount
Flement Hutcheson
Sebaston Rowan
Cleyton Bolton
Brynden Butterwell
Lambert Scorpionbane
Normyn Flowers
Addam
Characters confirmed on-screen to be in the second:
Balon
Otho Bracken
Addison Appleton
|
|
|
|
Post by Roland Cordwayner on Dec 14, 2018 21:58:51 GMT 1
Roland's tactical accumen could not match the finest minds in the Seven Kingdoms despite Ser Aemon Flower's sage advice. He was flustered at times, trying to think of what Ser Donnel would have done rather than simply acting himself. A competent performance, but Roland had spent too long as a sword sword and champion rather than a captain to make best use of his team. The young knight had much to learn. However, well advised and surrounded by competent knights, he was at least able to lead his personal squad in to position swiftly. D11 Melee Mass Battle Warfare Tactics then Command TN9 - Aemon assists: 2#5d6k4+6 18 26- 2 DoS on Tactics roll - 4 DoS on Command roll |
|
|
|
Post by Balon Blackbriar on Dec 14, 2018 22:33:41 GMT 1
[Scene 5] Gather, Warfare (Command) TN9, + Bonus, 1 Fatigue: 6d6k3+6 23, 3 DoS = 5 knights gathered.[Scene 5] Planning, Warfare (Tactics) TN9, + Bonus, 1 Fatigue: 3d6+6 17, 2 DoS[Scene 5] Assistance, Warfare (Command) TN9, + Bonus, 1 Fatigue: 6d6k3+6 23, 3 DoS = 6 Rounds of assistance bonus_____________________________________________________________________________________________________ Trying to keep OOC and IC information separate while staying true to Vainglorious & Prejudice.Balon had rallied several knights around him including Ser Otho and two Thorne knights. Now it was time for him to decide what to do next. The Brute's rising body count was sure to attract attention and an overwhelming response. He considered a defensive formation until reinforcements arrived but Otho was an offensive weapon that'd been unleashed and he doubted he'd be able to bring Ser Otho to heel. Balon decided to stick with his original target, Lord Appleton and the squad he'd rallied with. "Ser Otho! Take down that giant bastard!" Balon pointed to Edric Fossoway, one of the strongest men in the Reach. "You two," he was referencing the Thorne knights, "engage the Darklyn brothers while you two," Balon wasn't quite sure who they were, "take out who you can.""Ser Damon Crane is mine."
In the corner of his vision Balon could see Wildfyre heading his way. Excellent, reinforcements.
|
|
|
|
Post by Daeron Wildfyre on Dec 15, 2018 4:06:41 GMT 1
As the remnants of Lord Hayford's squad cleared out, there was an ebb in the chaos of the melee, and within that ebb he saw the crumpled remains of Lord Blackwood, identifiable only by his shield. Good riddance. If not in the melee, then on a battlefield at a later point. Such a man would eventually get his due for spreading lies and playing politics so recklessly. I guess I can lay the conundrum of Esmerelle being the Falcon to rest now that the perpetrator is dead.But then he saw the other corpse in the dirt next to him and his internal gloating ceased. Daeron was angry. No. He was livid. No. He was furious. Ser Marlon's face, or what was left of it, was little more than a pink streak across his torso. Although he wore the green of an opposing team, one aligned with an opposing faction, Ser Marlon was a Companion, one of Daeron's true brothers, and it didn't take a maester to deduce what happened to him. In that moment all concerns about politics, the melee, and who should sit on the Iron Throne were swept aside and in their stead they were replaced with a singular directive. Revenge. Attacking the Brute of Bracken was no laughing matter and the least of its risks was his entire faction's loss in the melee, but he didn't care. He was going to kill that bastard. Raising his sword he shouted out to his gathered squad. "Men to me. We have a new target, one who's defeat will bring us glory beyond this tourney. Men, we're going to finish Blackfyre's work and kill the fucking Brute."
GM-Scene 5-Gather-Warfare (Command): 5d6k4+5 22 (3 DOS) (5 knights gathered) GM-Scene 5-Planning-Warfare (Tactics): 4d6+5 21 (3 DOS) (Target Otho) GM-Scene 5-Assist-Warfare (Command): 5d6k4+5 23 (3 DOS) (6 Rounds of Assistance) |
|
|
|
Post by Father on Dec 15, 2018 12:26:22 GMT 1
Blackfyre: 5d6k4+4 19 5d6k4+4 25 3 DoS, 4 DoS. Enters on R2. Bittersteel: 7d6k4+4 17 7d6k4+4 24 2 DoS, 3 DoS. Enters on R3 Redtusk: 4d6k3+4 17 4d6k3+4 15 2 DoS, 2 DoS enters on R4 Robb: 5d6k4+3 16 5d6k4+3 16 2 DoS, 2 DoS enters on R4 Maekar: 4d6k3+4 15 4d6k3+4 14 2 DoS, 2 DoS enters on R4 Stormbreaker: 4d6k3+4 19 4d6k3+4 15 3 DoS, 2 DoS enter on R4
|
|
|
|
Post by Father on Dec 15, 2018 17:52:50 GMT 1
|
|
|
|
Post by Father on Dec 15, 2018 18:11:09 GMT 1
Yeah..not 24h yet, but I need to plow ahead with setting things up. Addam: 3#4d6k3+5 16 21 16 2-3-2 |
|
|
|
Post by Father on Dec 15, 2018 18:36:49 GMT 1
So the reformed squads for this scene are as follows, lieutenants with 2 or less in their squad links up with other lieutenants to make up for their dwindling numbers.
Maekar:
Desmond Bridges (4 members)
Damon Lannister (5 members)
Marlon Manderly (3 members)
Garth Oldflowers (5 members)
Leo Shermer (5 members)
Bittersteel:
Addam (4 members, includes Petyr Costayne and Albett Tarly)
Farman Flowers (3 members)
Normyn Flowers (4 members, includes Quentyn Cordwayner, Uthor Cockshaw and Lambert Scorpionbane)
Balon (5 members, includes Otho Bracken, Rufus Thorne and Symon Thorne).
Redtusk:
Owen Roxton (2 members)+Parmen (2 members)
Lewyn Redwyne (3 members, includes Wendel Redwyne)
Willem Redwyne (3 members, includes Horas Redwyne)
Sandor Redwyne (3 members)
Lancel Cuy (3 members)
Robb:
Gormon Peake (With Damon Peake)+Tanton Fosoway (1 member)+Randyll Peake (0 members)
Merle Crakehall (2 members)+Laenor Peake (with Seban Ward and Clarent Peake)
Paxter Crane (3 members, including Darren Crane)
Blackfyre:
Daeron (5 members, includes Martyn Stackhouse and Benjen Willum)
Aubrey Ambrose (4 members, includes Vardis Wythers)
Dunstan Shawney (5 members, includes Galladon Lowther and Balman Bulwer)
Glendon Hewett (5 members, includes Theomore Bulwer, Garret Tyrell and Edmyn Conklyn)
Jaime Graceford (6 members, includes Jonothor Wellbeck and Willas Tyrell)
Stormbreaker:
Alekyne Tarly (2 members)+Robyn Rhysling (1 member)
Harlon Tarly (2 members)+Pearce Caron (1 member)
Manfryd Motoon (0 member)+Florian Motoon (3 members)
Roland:
Damon Crane (6 members, Edric Fossoway, Eddard Darklyn, Selmond Footly, Addam Darklyn, Roland Leygood, Addison Appleton)
Donnel Arryn (4 members, Ser Arlan Green, Lyonel of the Cockleswent, Lewyn Appleton, Randyll Ashford)
Ulbert Starkwood (3 members, Humfrey Harding, Imre Orme, Flement Hutcheson)
Sebaston Rowan (2 members, Cleyton Bolton, Brynden Butterwell)
Aerion Flowers (3 members, Samwell Rowan, Addam Frey, Eoric Applehouse)
The way this will play out is that the various squad leaders will seek out foes (or turtle down in defense which Robb and Stormbreaker's men will be doing), and then the captains decide where they want to go, entering on rounds:
2: Roland, Daemon.
3: Bittersteel.
4. Maekar, Robb, Stormbreaker, Redtusk.
|
|
|
|
Post by Balon Blackbriar on Dec 15, 2018 23:17:08 GMT 1
Original post updated with fluff and targeting Damon Crane's team.
|
|
|
|
Post by Father on Dec 18, 2018 20:55:40 GMT 1
Off-screen squad on squads (assuming none of the captains wants to jump into these):
|
|
|
|
Post by Father on Dec 18, 2018 22:11:30 GMT 1
Roland's team is in disarray. Ser Aerion and Lord Donnel pursues the strategy of battering down the team of the Red Lion, though the utter ruin of Ser Desmond's squad probably means that Prince Maekar is likely to focus his attentions to those of his men that are still fighting against a tough assault from those flying the banner of Redtusk means that if Ser Robb Reyne comes to their aid, Ser Aerion and Lord Arryn will soon find themselves trapped between Lord Gormon Peake and The Red Lion.
Elsewhere it looks even bleaker, Ser Sebaston and Lord Unwin are overwhelmed, while Ser Damon Crane and his men are overrun, with only Ser Daeron abandoning the partisan ways of the rest of his squad to engage Ser Otho Bracken, in what increasingly looks like a one-man quest for avenging Ser Marlon.
Three places Roland and his reserves needs to be, and where he does not go, the squads there are likely to fall apart.
Basically, pick out one of the scene 5 threads to join in, roll initiative and we'll sort it from there, need not be one of those with your squads in, but preferably not one of the off-camera fights. It would also be possible to split your reserves.
Captain's reinforcements works in the manner that they enter the sub-scenes by charging in their order of initiative.
|
|
|
|
Post by Roland Cordwayner on Dec 19, 2018 17:47:17 GMT 1
Concentration of forces and defeat in detail - lessons the Reachmen had learned bitterly against the Dornish. As yet unwilling to rob Ser Daeron of the glory of avenging their Companion, Roland rode to attempt to complete his team's strategy, trying to fill in where others were too hard pressed.
They needed to try to defeat their foes swiftly, before the other captains entered the fray.
OOC: Roland, Aerion, Wyl, Symon and Jaime Fossoway to Lord Arryn's Scene.
Tommard and Preston to Ser Aerion Flower's scene.
|
|
|
|
Post by Father on Dec 20, 2018 13:40:09 GMT 1
Moving from one thread into another works like so:
1. No characters from another team in the thread at the start of the round: you may then charge into another thread keeping your initiative (this still takes another greater action)
2. Characters from another team in the thread at the start of the round: you may take a greater action to remove yourself from the thread, and then charge into another thread (requires extra actions to do in the same round), characters from other teams may charge you as you make this transition and basically follow you out of the thread.
Also, LT's assistance bonus only applies for as long as the LT is in the same thread as you and not defeated. (I forgot this for NPC's for the first round and I am not retconning anything that doesn't affect PC's directly for the time being).
|
|
|
|
Post by Father on Dec 21, 2018 1:55:47 GMT 1
Going to shorten the length of the scene to 5 rounds, with end of round tallies of scores starting from R2.
|
|
|
|
Post by Father on Dec 21, 2018 16:26:11 GMT 1
Ser Aerion Baratheon, Prince Maekar and Ser Robb Reyne sees their squads being overrun. Bittersteel have burnished his tactical credentials by his effective splitting of Ser Roland's men, troubles that were compounded by Lord Arryn and Ser Aerion opening up a front against the Red Lion, across three fronts, the once front-runner has now sustained the heaviest losses, whereas the forces of Redtusk, Blakcfyre and Bittersteel have largely managed to keep themselves intact, with Ser Roland Redwyne increasingly looking like a very strong challenger for the victory given the present trends. Wear and tear after first two rounds:
Robb:
Meribald Vance -0.5
Rolph Lydden -0.5
Trenton Hill -0.5
Rickon Cockshaw -0.5
Seban Ward -4
Clarent Peake -2 (Escort)
Laenor Peake -2 -10%
Paxter Crane -4 -10%
Sebaston Rowan -4 -10%
Merle Crakehall -3 -10%
Roland
Tommard Heddle -4
Eddard Darklyn -2
Edric Fossoway -3
Humfrey Harding -2
Addison Appleton -2
Addam Darklyn -2
Roland Leygood -2
Flement Hutcheson -2
Brynden Butterwell -2
Preston Oakheart -4 (escorts foe off field)
Donnel Arryn -2 -5%
Sebaston Rowan -4 -5%
Ulbert Starkwood -3 -5%
Bittersteel
Albett Tarly -2
Joffrey Swann -0.5
Rickard Rivers -0.5
Terrence of Harroway -0.5
Selwyn Rivers -0.5
Lambert Scorpionbane -4
Daemon:
Bryen Stackhouse -0.5
Matthew Mullendore -1
Lucas Inchfield -1
Aubrey Ambrose -5 -5% (Escorts off scene)
Maekar:
Rodrik Shermer -0.5
Torrhen Blackwood -0.5
Randall Whent -0.5
Garth Bridges -0.5
Meribald Blackwood -0.5
Jarmen Caswell -0.5
Lucas Ashford -0.5
Tristifer Blackwood -0.5
Corlys Blackwood -0.5
Tytos Hayford -0.5
Petyr Bulwer -0.5
Humfrey Willum -0.5
Harmen Roxton -0.5
Robert Varner -0.5
Addam Payne -0.5
Steffon Bushy -0.5
Kermit Darklyn -0.5
Elwood of Duskendale -0.5
Leo Shermer -1 -10
Garth Oldflowers -1 -10%
Marlon Manderly -2 -10%
Desmond Bridges -2 -10%
Damon Lannister -4 -10%
Stormbreaker:
Boros Leygood -0.5
Jon Cordwayner -0.5
Martyn Baratheon -0.5
Unwin of Horn Hill -0.5
Jasper Rhysling -0.5
Tyrion Tarly -0.5
Marlon Rhysling -0.5
Aegor Caswell -0.5
Kevan Frey -0.5
Harlon Tarly -3 -10%
Alekyne Tarly -5, -10%
Robyn Rhysling -5 -10%
Manfryd Mooton -2 -10%
Redtusk:
Rolland Uffering -0.5
Jon Westbrook -0.5
Jeor Mullendore -0.5
Allesander Roxton -0.5
Nestor Redwyne -0.5
Team scores after round 2 and modifiers to Warfare tests: Blackfyre 58.5 +1D+3B+3 (Or +2D+1B+3) Redtusk 52.1 +2B+2 (Or +1D+2) Roland 44.5 +1B+4 Bittersteel 42.1 +3 Robb 4.4 -1D+2 Maekar: Disintegrated Stormbreaker: Disintegrated Bittersteel and his reserves are about to make their move. |
|